
How Does This Blog Work?
Ever wondered how this blog works under the hood? In this article, I'll walk you through the entire architecture of the application, from the tech stack all the way to the process of writing an article. And yes, I'll even show you how I write my articles from VS Code!
The Tech Stack
This blog is built with modern web technologies:
- React 19 -- for the user interface
- TypeScript -- for typed and more reliable code
- Vite -- as an ultra-fast build tool
- React Router v7 -- for navigation between pages
- react-markdown -- to transform Markdown into HTML
- rehype-raw + rehype-sanitize -- to allow raw HTML in Markdown while staying secure
Project Structure
Here's what the project tree looks like:

├── .github/
│   └── workflows/
│       └── deploy.yml        ← CI/CD pipeline
├── public/
│   ├── home.md               ← Home page content
│   ├── portfolio.md           ← Portfolio content
│   └── articles/
│       ├── index.json         ← List of all articles
│       ├── hello-world.md     ← An article
│       ├── how-this-blog-works.md  ← This article!
│       └── /articles/assets/            ← Article images
├── src/
│   ├── main.tsx               ← React entry point
│   ├── App.tsx                ← Main router
│   ├── components/
│   │   ├── Header.tsx         ← Navigation bar
│   │   └── Footer.tsx         ← Footer
│   └── pages/
│       ├── Home.tsx           ← Home page
│       ├── BlogList.tsx       ← Article list
│       ├── Article.tsx        ← Article reader
│       ├── Portfolio.tsx      ← Portfolio page
│       └── NotFound.tsx       ← 404 page
└── vite.config.ts             ← Vite configuration
The core idea is simple: content is separated from code. Pages are written in Markdown in the public/ folder, and the React code in src/ takes care of rendering them.
The Routing System
The App.tsx file defines all application routes using React Router:
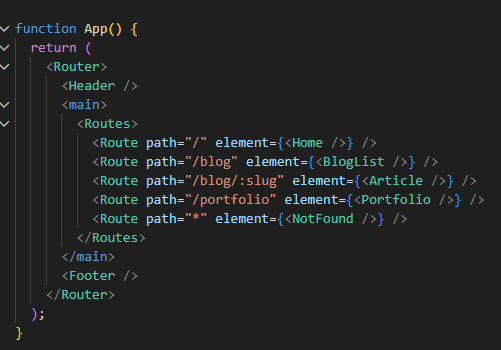
| Route | Page | Description |
|---|---|---|
/ |
Home | Home page, loadshome.md |
/blog |
BlogList | List of all articles |
/blog/:slug |
Article | A single article, loadsarticles/{slug}.md |
/portfolio |
Portfolio | Portfolio page, loadsportfolio.md |
* |
NotFound | 404 page for unknown URLs |
Each page has a well-defined role: it fetches a Markdown file, transforms it into HTML with react-markdown, and displays it on screen.
How Does an Article Work?
This is the most interesting part! Here's the lifecycle of an article:
1. The index.json File
All articles are referenced in public/articles/index.json. Each entry contains the article's metadata:
[
  {
    "slug": "hello-world",
    "title": "Hello World",
    "description": "A sample post for Fox's Blog.",
    "date": "2026-03-08"
  }
]
- slug -- the unique identifier, used in the URL (
/blog/hello-world) - title -- the title displayed in the list
- description -- a short summary
- date -- the publication date
2. The Markdown File
The article content is a simple .md file in public/articles/. The filename matches the slug defined in index.json.
You can put anything in there: headings, lists, images, tables, and even raw HTML thanks to rehype-raw!
3. React-Side Rendering
When you visit /blog/hello-world, here's what happens:
- React Router captures the
slugparameter from the URL - The
Article.tsxcomponent fetches/articles/hello-world.md - The Markdown is transformed into HTML by
react-markdown - Links to
/articles/assets/are automatically rewritten to/articles//articles/assets/ - In parallel, metadata is loaded from
index.jsonto display the date and description
It's as simple as that!
The Home Page and Portfolio
The Home and Portfolio pages work in exactly the same way: they load a Markdown file (home.md or portfolio.md) and render it as HTML.
The special thing is that they use a custom sanitization schema that allows class and style attributes on all HTML elements. This lets me write styled HTML directly in Markdown, like image galleries for example.
The Header and Footer
The Header is pinned to the top of the page with position: fixed. It contains:
- My GitHub avatar (loaded directly from
github.com/fox3000foxy.png) - The blog title
- Navigation links: Home, Blog, Portfolio
The Footer is minimalist: just a copyright with the current year calculated dynamically.
The Dark Theme
The site is always in dark mode -- no light/dark toggle. This is a deliberate choice: color-scheme: dark is set in the global styles, with a black background #000 and white text #fff. Links are blue (#64b5f6) and turn green on hover (#81c784).
How I Write an Article
Now for the practical part! Here's my workflow for writing a new article:
Step 1: Create the Markdown File
I open VS Code and create a new .md file in public/articles/:
Step 2: Write the Content
I write the article content directly in Markdown. VS Code offers an excellent built-in Markdown preview:

For images, I place them in public/articles//articles/assets/ and reference them using standard Markdown syntax:

The Article.tsx component automatically rewrites the /articles/assets/ path to /articles//articles/assets/ so that images display correctly.
Step 3: Register the Article in index.json
Once the article is done, I add it to public/articles/index.json so it shows up in the blog list:
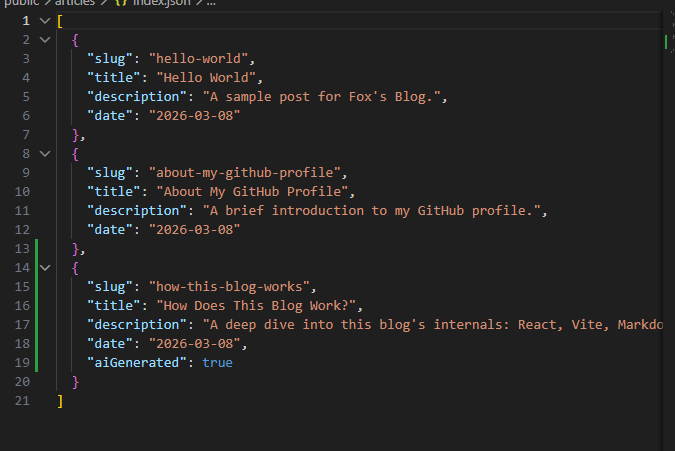
Step 4: Test Locally
I start the Vite dev server:
pnpm dev
Vite starts in milliseconds and I can see my article in real time at localhost:5173:
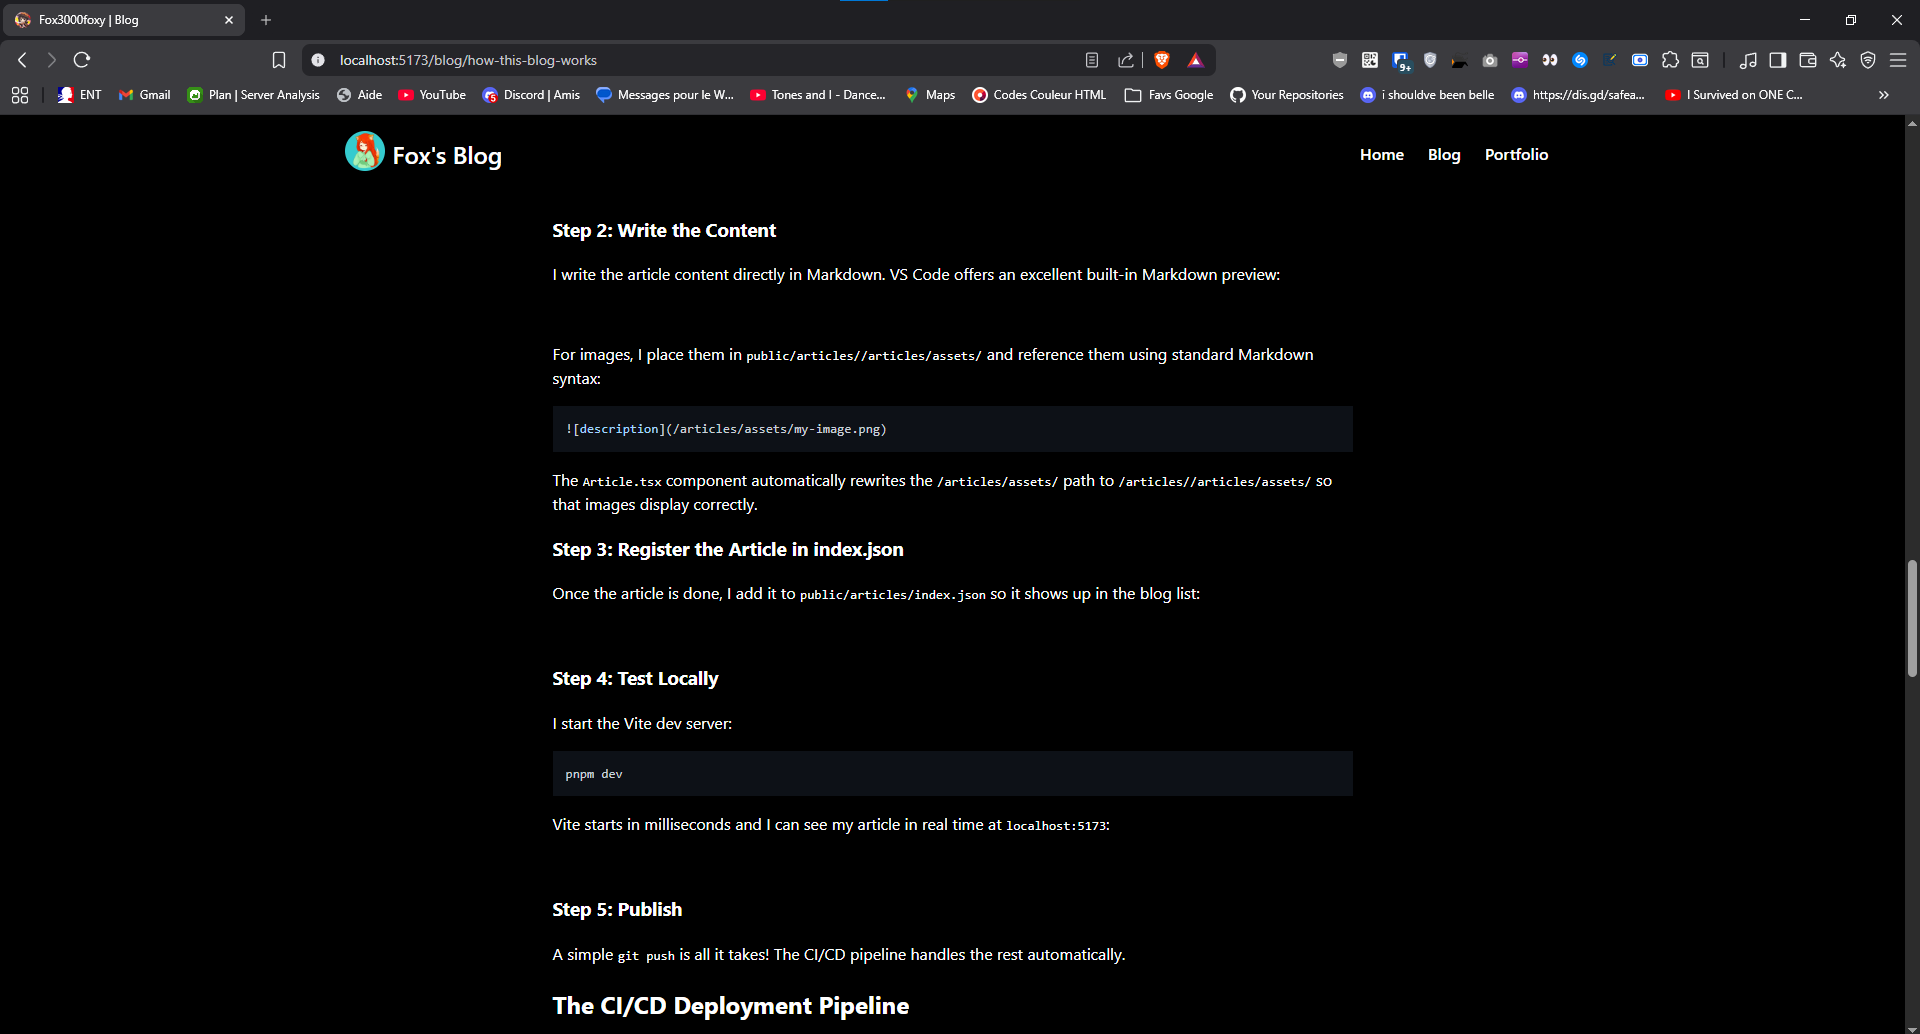
Step 5: Publish
A simple git push is all it takes! The CI/CD pipeline handles the rest automatically.
The CI/CD Deployment Pipeline
I've set up a full GitHub Actions pipeline that automates linting, building, and deploying the site every time I push to main. Let's break it down.
The workflow lives in .github/workflows/deploy.yml and is split into two jobs: build and deploy.
Triggers
on:
  push:
    branches:
      - main
  pull_request:
    branches:
      - main
The pipeline runs on every push to main and on every pull request targeting main. This means PRs get checked (lint + build) before merging, but only pushes to main actually trigger a deployment.
Job 1: Build
The build job runs on ubuntu-latest and goes through these steps:
- Checkout -- Clones the repository with full history (
fetch-depth: 0) - Setup pnpm -- Installs the latest version of pnpm using
pnpm/action-setup@v4 - Setup Node.js 20 -- Configures Node with pnpm caching enabled for faster installs
- Install dependencies -- Runs
pnpm install --frozen-lockfileto ensure reproducible builds (no lockfile changes allowed) - Lint -- Runs
pnpm run lint(ESLint) to catch code quality issues before building - Build -- Runs
pnpm run build, which first checks TypeScript types (tsc -b) then bundles everything with Vite - Upload artifact -- Uploads the
dist/folder as a build artifact for the deploy job
If any step fails -- a lint error, a type error, a build error -- the whole pipeline stops and nothing gets deployed. This keeps the live site safe from broken code.
Job 2: Deploy
The deploy job only runs if:
- The build job succeeded (
needs: build) - The event is a push (not a PR)
- The branch is main
if: github.event_name == 'push' && github.ref == 'refs/heads/main'
It then:
- Downloads the build artifact -- Grabs the
dist/folder produced by the build job - Configures GitHub Pages -- Sets up the Pages environment
- Uploads to Pages -- Packages the
dist/folder for GitHub Pages - Deploys -- Publishes the site using
actions/deploy-pages@v4
The Full Picture
Here's what happens from writing to deployment:
Write article in VS Code
        ↓
   git add & commit
        ↓
      git push
        ↓
  GitHub Actions triggers
        ↓
  ┌─────────────────┐
  │   BUILD JOB     │
  │  1. Checkout    │
  │  2. Setup pnpm  │
  │  3. Setup Node  │
  │  4. Install     │
  │  5. Lint ✓      │
  │  6. Build ✓     │
  │  7. Upload dist │
  └────────┬────────┘
           ↓
  ┌─────────────────┐
  │  DEPLOY JOB     │
  │  1. Download    │
  │  2. Configure   │
  │  3. Upload      │
  │  4. Deploy 🚀   │
  └─────────────────┘
           ↓
    Live on GitHub Pages!
The entire process takes about a minute from push to live. No manual deploy, no FTP, no SSH -- just git push and it's done.
The Production Build
Under the hood, the pnpm build command runs:
tsc -b-- Checks TypeScript typesvite build-- Bundles and optimizes all the code
Vite produces minified and optimized files with automatic code-splitting. The result is a blazing-fast static site.
Why This Architecture?
I could have used a CMS, a static site generator like Hugo or Jekyll, or even Next.js. But here's why I chose this approach:
- Simplicity -- Write in Markdown, push to GitHub, it's live
- Full control -- No dependency on a CMS or database
- Performance -- Vite + React = fast loading
- Flexibility -- I can mix Markdown and HTML however I want
- Learning -- It's a great project to master React and TypeScript
- CI/CD -- Automated quality checks and deployment with GitHub Actions
Conclusion
This blog is a simple but well-thought-out project: Markdown for content, React for rendering, Vite for performance, GitHub Actions for CI/CD, and GitHub Pages for hosting. No database, no backend server, just static files served efficiently with an automated pipeline ensuring quality at every push.
Thanks for reading, and see you in the next article! 🦊